 Save
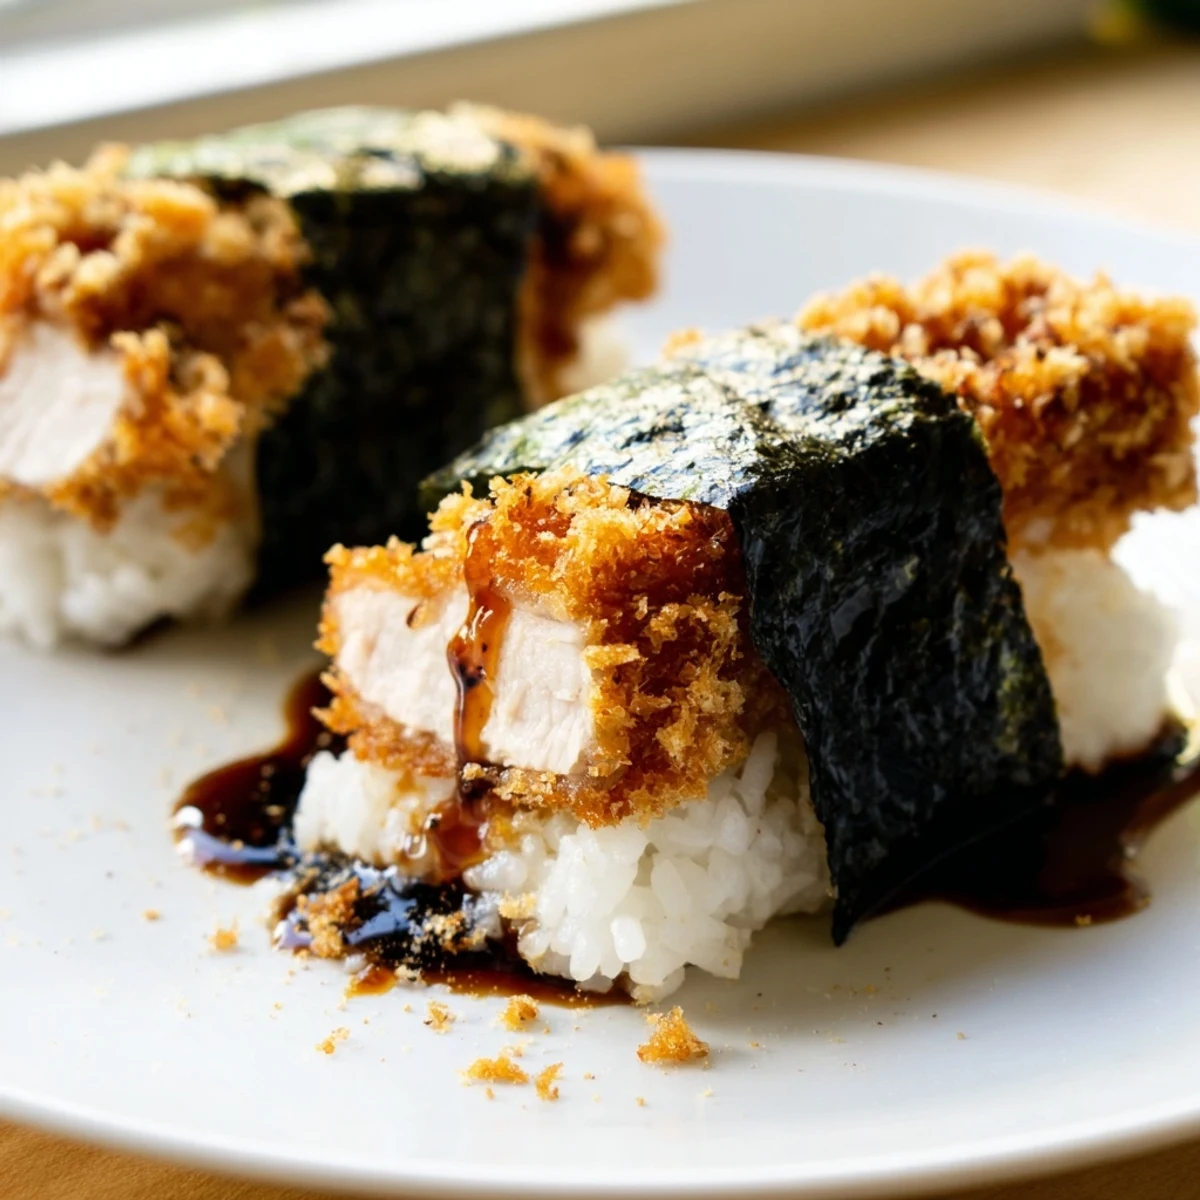
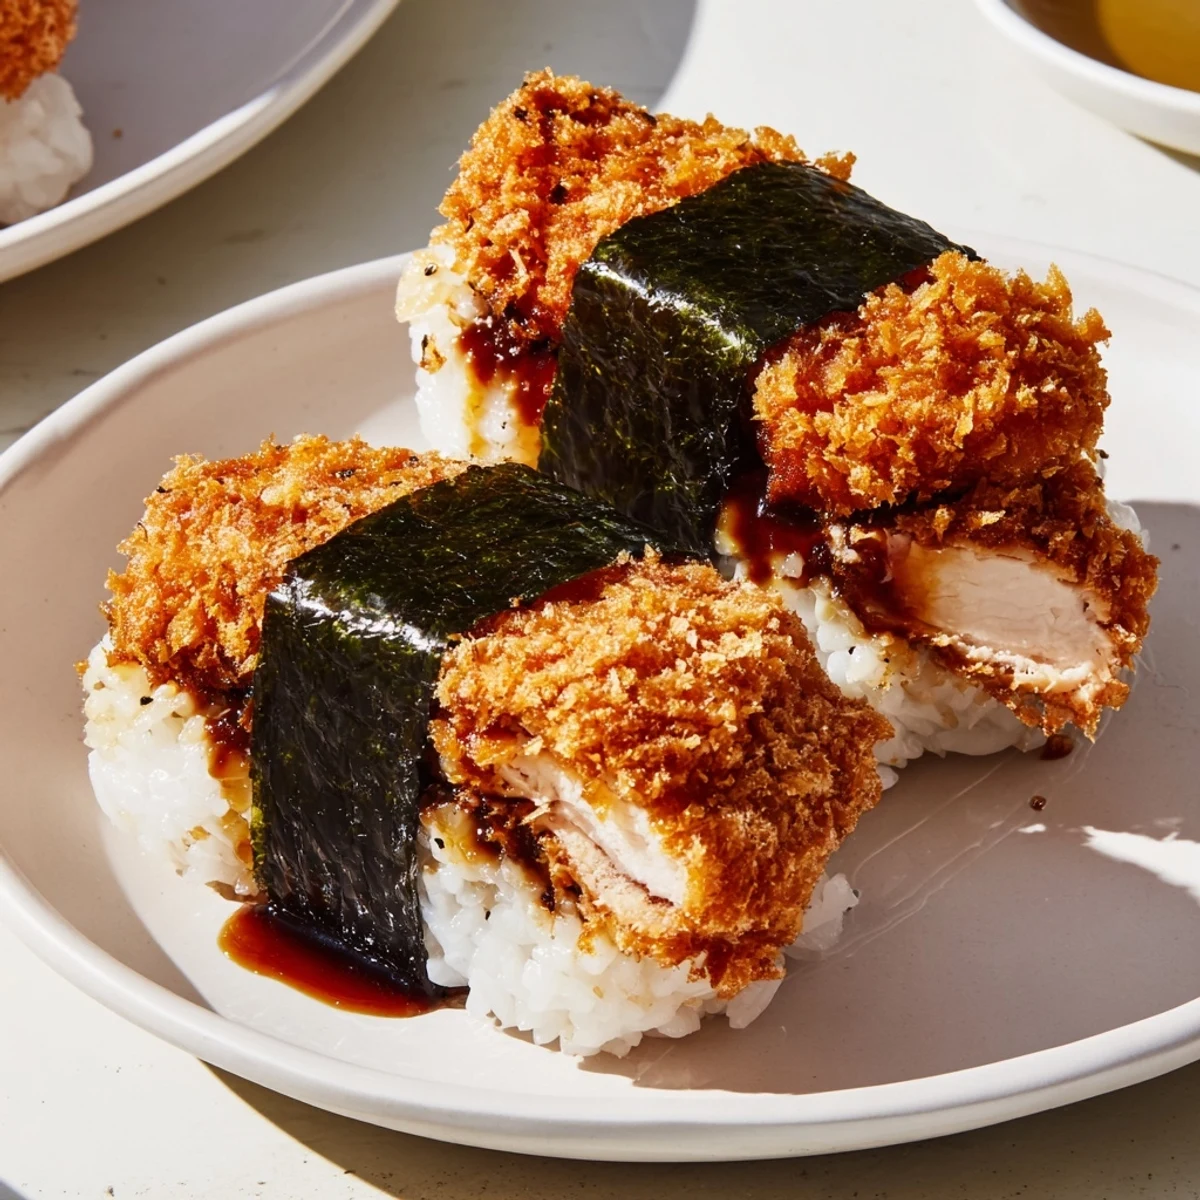
Save Chicken katsu musubi combines the crunch of golden panko-fried chicken with fluffy vinegared rice, all wrapped in sheets of nori seaweed. The preparation starts with pounding boneless thighs to even thickness, then coating them in flour, egg wash, and panko before shallow frying until perfectly crisp. Warm rice gets seasoned with a vinegar-sugar blend while the chicken cooks, creating that authentic sushi-style flavor foundation. A simple sauce whisked from tonkatsu sauce, soy sauce, and honey adds savory-sweet depth that ties everything together.
Assembly requires damp hands to press the rice into compact rectangles, layering them with sliced chicken and sauce before wrapping tightly in nori. The seaweed softens slightly as it sits, creating the ideal texture balance between tender rice, crispy coating, and supple wrapper. Each musubi offers complete protein satisfaction with the satisfying handheld convenience that makes musubi such a beloved Hawaiian snack food.
The smell of panko hitting hot oil takes me straight back to my first apartment kitchen, where I learned that the crunchiest chicken comes from patience and a gentle hand. I stumbled onto musubi during a layover in Honolulu, watching airport workers press these neat little packages with practiced speed, and knew I had to recreate that perfect bite at home. There's something deeply satisfying about wrapping warm, crispy things in nori—like a little present you get to unwrap and eat immediately.
I made a batch for a beach picnic last summer, and watching my friends bite into their first musubi—eyes widening at that first crunch, then the sauce hitting—became one of those food moments that sticks with you. They kept asking what was in the sauce, and honestly, I'd thrown it together based on what I had in the pantry, which is exactly how the best recipes often get born.
Ingredients
- Chicken thighs: Thighs stay juicier than breast through the frying process, and that extra fat means more flavor in every bite
- Panko breadcrumbs: Japanese breadcrumbs create this ridiculously airy, lace-like crunch that regular crumbs just can't match
- Short-grain rice: You need those sticky, clingy grains to hold everything together—long-grain rice will just fall apart
- Nori sheets: Halving them gives you the perfect wrapper size without overwhelming the filling
- Tonkatsu sauce: This sweet-tangy Japanese sauce is non-negotiable for authentic flavor, though Worcestershire makes a passable sub
Instructions
- Get the chicken ready:
- Pound those thighs until they're even thickness—about half an inch does the trick. Season both sides generously with salt and pepper, letting them sit while you set up your dredging station.
- Set up your coating line:
- Three shallow bowls: flour first, then egg whisked with milk, then panko. The egg wash helps the panko actually stick, and that milk step? It makes everything cling better.
- Crisp it up:
- Heat about half an inch of oil until it shimmers. Fry chicken 3-4 minutes per side until golden brown and cooked through. Let drain on paper towels while you slice it into musubi-sized strips.
- Season the rice:
- Mix vinegar, sugar, and salt until dissolved. Gently fold this through your warm rice—treat it carefully so you don't mash those grains. Let it cool just slightly so it's handleable but still warm.
- Whisk that sauce:
- Combine tonkatsu sauce, soy sauce, and honey until smooth. Taste it—adjust based on whether you want more sweet or tangy.
- Start wrapping:
- Lay plastic wrap down, then a nori sheet shiny-side down. With wet hands, press about 1/4 cup seasoned rice into a neat rectangle in the center. Sprinkle with furikake if you're using it.
- Layer it up:
- Place a chicken strip on the rice, drizzle with sauce, then add another thin layer of rice on top. Press gently but firmly—you want everything to hold together without crushing the rice.
- Seal the deal:
- Use the plastic wrap to fold the nori tightly around the filling, pressing like you're shaping a little present. Let it rest 2-3 minutes so the nori softens and everything settles. Repeat until you've used all your ingredients.
 Save
Save These became my go-to contribution to potlucks after the third time someone asked me to bring them, and there's something lovely about how portable and self-contained they are—perfect little packages of comfort food that feel special but eat casual.
Making Them Ahead
You can assemble these several hours ahead, but wrap each one individually in plastic wrap to keep the nori from getting soggy. The texture holds up beautifully, and I've even packed them for next-day lunch with great results.
Sauce Variations
Sometimes I add a squirt of sriracha to the sauce mixture when I want heat, or a drop of sesame oil for depth. The classic version is hard to beat, but playing with the sauce ratios is an easy way to make these your own.
Common Questions
Can I bake these instead? You can bake the chicken at 425°F for about 20 minutes, flipping halfway, but honestly, the texture won't be quite the same. That hot oil creates a crispness that's pretty essential to the musubi experience.
- Double-frying the chicken adds that extra crunch that restaurant versions have
- Chicken breast works if you prefer white meat, just watch it carefully so it doesn't dry out
- Extra sauce on the side never hurts, especially for dipping
 Save
Save There's genuine joy in that first bite—the nori yielding, then the crunch, then the warm, saucy, tender chicken underneath. Make these once, and they'll find their way into your regular rotation.
Recipe Q&A
- → What makes chicken katsu musubi different from regular musubi?
-
Traditional musubi features SPAM or simple proteins, while chicken katsu musubi showcases panko-breaded fried chicken cutlets. The crispy texture and seasoned coating add extra crunch and depth compared to the classic version, making it a heartier, more substantial snack.
- → Can I make chicken katsu musubi ahead of time?
-
These musubi hold up well for several hours when wrapped tightly in plastic wrap. The chicken stays crispy and the nori maintains its texture, making them perfect for meal prep or packing. Best enjoyed within 24 hours for optimal texture and flavor.
- → What type of rice works best for musubi?
-
Short-grain Japanese rice creates the ideal sticky texture needed to hold the musubi together. The grains cling to each other naturally, allowing you to form compact rectangles that don't fall apart when wrapped in nori. Medium-grain rice works as a substitute.
- → How do I get the chicken katsu extra crispy?
-
Double-frying technique creates maximum crunch—fry once until cooked through, let rest, then fry again briefly before assembling. Ensure your oil stays at medium heat (around 350°F) and don't overcrowd the pan, which drops temperature and makes coating soggy.
- → Can I bake the chicken katsu instead of frying?
-
Baking works for a lighter version, though the texture won't be quite as crisp. Coat chicken the same way, then bake at 425°F for 20-25 minutes, flipping halfway through. Spray with oil before baking to help the panko golden and crisp up in the oven.
- → What can I substitute for tonkatsu sauce?
-
Worcestershire sauce mixed with ketchup and a dash of oyster sauce creates a similar sweet-savory profile. Bull-dog style sauce or even bottled teriyaki sauce can work in a pinch, though the flavor profile will shift slightly.